Best overall: build-your-own yogurt bowls. Best for familiar-food starters: toast faces. Best pantry-based option: mashed-bean wraps. These cooking recipes for kids with autism give you flexible ways to cook together in 2026, with separate ingredients, clear jobs, and no pressure to taste.
- Build-your-own yogurt bowls lead these cooking recipes for kids with autism because ingredients can stay separate.
- Toast faces suit familiar-food starters; mini pita pizzas suit children who enjoy assembling a warm meal.
- Match kitchen jobs to your child’s interests, communication, and safety skills—not age alone.
- Autism Learn & Play serves Brooklyn families seeking children’s therapy services, community programs, and online classes.
Why this matters
Cooking together can be a shared activity without becoming a lesson in eating unfamiliar food. Your child can wash fruit, choose a bowl, point to an ingredient, or simply watch. Eating the finished recipe is not a requirement.
The best recipe is one your child can help shape, not one that demands tolerating a disliked texture. Start with something familiar and change only the parts your child wants to change. A separate topping dish often makes more sense than a mixed bowl.
Autism Learn & Play is a Brooklyn-based nonprofit serving children ages 2–18 through therapy services, community programs, and online classes. For family cooking in 2026, use the ideas below as home activities—not as treatment or a promise of particular outcomes.
What makes the best cooking recipes for kids with autism?
Choose recipes by the activity your child wants to join, rather than by a diagnosis alone. These criteria determine the ranking:
- Familiar ingredients: Begin with foods your child already recognizes. Keep optional additions separate.
- Adjustable textures: Offer smooth, soft, or crisp components without assuming every autistic child prefers the same sensation.
- Clear steps: Give each task an obvious beginning and finish, such as placing toppings into a bowl.
- Flexible participation: Watching, choosing, scooping, and communicating all count as joining in.
- Manageable safety: Separate child-led assembly from adult handling of heat, sharp tools, and choking hazards.
- Shared enjoyment: Choose something you can make alongside your child, without requiring conversation or tasting.
These are family cooking criteria, not claims that a recipe improves communication or changes sensory preferences.
Best recipes at a glance for 2026
| Recipe | Best for | Standout feature | Key limitation |
|---|---|---|---|
| Build-your-own yogurt bowls | Separate-ingredient assembly | Toppings stay in individual dishes | Wet textures and dairy do not suit everyone |
| Toast faces | Familiar-food starters | A familiar base with optional decoration | Crumbs and crisp textures can be uncomfortable |
| Mini pita pizzas | Warm-meal assembly | Child chooses where toppings go | Adult must handle heating and cooling |
| Soft-fruit bowls | Washing and sorting | Preparation can happen without mixing | Fruit needs choking-safe preparation |
| Mashed-bean wraps | Pantry-based preparation | Mashing gives the task a visible endpoint | Bean texture and folding can be frustrating |
| Rice-and-topping bowls | Older-child meal planning | Components work separately or together | Cooked rice needs careful food handling |
The quantities below are suggested starting portions for these home recipes. Adjust them to your family's needs; they are not dietary prescriptions.
1. Build-your-own yogurt bowls: best for separate-ingredient assembly
A yogurt bowl lets your child decide whether ingredients touch. You can serve plain yogurt beside a familiar fruit rather than combining everything. This recipe ranks first because assembly requires no heat and each component remains easy to identify.
Suggested ingredients: ½ cup yogurt and ¼ cup soft, safely prepared fruit. Use ingredients that fit your child's allergies and dietary needs; leave toppings out entirely if preferred.
Make it together:
- Place the yogurt and fruit in separate dishes.
- Invite your child to choose a spoon or serving bowl.
- Scoop yogurt, then add fruit only if your child wants it combined.
Your child can participate by indicating which dish to use. Keep a clean spoon nearby if sticky hands or a messy utensil make the activity uncomfortable.
Yogurt bowl pros:
- No heating step.
- Separate ingredients remain visible.
- Scooping offers a clear, repeatable job.
Yogurt bowl cons:
- Wet textures can be unwelcome.
- Dairy yogurt is unsuitable for a child with a milk allergy.
Best for: Children who prefer choosing components separately.
Verdict: Buy into this option first when yogurt is already a familiar food.
2. Toast faces: best for familiar-food starters
Toast faces use a familiar slice of bread as a base for optional decoration. The face is an invitation, not an assignment: plain toast, stripes, or ingredients beside the bread are equally valid choices.
Suggested ingredients: 1 slice of bread, a familiar spread, and a small dish of soft toppings prepared safely for your child. Choose bread and spreads around known allergies.
Make it together:
- An adult handles the toaster and checks the toast before serving.
- Offer the bread plain or with a familiar spread.
- Invite your child to place toppings using fingers or a spoon.
Spreading and placing ingredients also appear in everyday hand-use activities. For more home ideas, explore fine motor skill activities for autism without treating cooking as a performance test.
Toast face pros:
- Starts with an identifiable base.
- Decoration is optional.
- Ingredients can remain alongside the toast.
Toast face cons:
- Crumbs or crisp edges can bother some children.
- Hot toast and the toaster require adult attention.
Best for: Children who want a small variation on familiar bread.
Verdict: Buy into toast faces when decoration sounds enjoyable; skip the face-making requirement.
3. Mini pita pizzas: best for warm-meal assembly
Mini pita pizzas separate preparation from the adult-controlled heating step. Your child can choose sauce, cheese, or another familiar topping without needing to operate an oven. Keep a plain portion aside if the cooked result feels different from the ingredients.
Suggested ingredients: 1 small pita, 1 tablespoon tomato sauce, and 2 tablespoons shredded cheese. Use only toppings that are ready to eat; do not include raw meat in this activity.
Make it together:
- Put each topping in its own dish.
- Invite your child to spread sauce or place cheese.
- An adult heats the assembled pita using appropriate appliance instructions, then checks that it is cool enough to eat.
Explain before heating that cheese melts and the pita's texture changes. A child can enjoy assembly without wanting the finished pizza.
Mini pita pizza pros:
- Offers distinct topping-placement jobs.
- Leaves ingredient choices with the child.
- Connects preparation to a warm family meal.
Mini pita pizza cons:
- Heating adds a waiting stage.
- Smells and melted textures can be uncomfortable.
Best for: Children who enjoy arranging ingredients before an adult cooks.
Verdict: Buy into mini pita pizzas when the heating step fits your child's comfort.
4. Soft-fruit bowls: best for washing and sorting
A fruit bowl works as a washing or sorting activity even when your child does not want mixed fruit. Offer separate dishes and let your child organize ingredients in any preferred way. Avoid insisting on a pattern or a finished arrangement.
Suggested ingredients: ½ banana and ¼ cup ripe, soft pear, or other familiar fruit prepared for your child's chewing skills. An adult handles cutting and removes pits, tough peel, and other unsuitable parts.
Make it together:
- Wash fruit that needs washing before preparation.
- Let your child move prepared pieces into dishes.
- Offer a choice between keeping fruits separate and combining them.
For young children, avoid whole grapes, hard raw apple chunks, and skewers. Prepare food around your child's individual eating skills; ask their clinician for guidance if swallowing is a concern.
Soft-fruit bowl pros:
- No heating equipment.
- Washing offers a role before eating.
- Sorting does not require mixing.
Soft-fruit bowl cons:
- Sticky juice can be unpleasant.
- Fruit still requires careful choking-risk preparation.
Best for: Children who enjoy moving or organizing ingredients.
Verdict: Buy into soft-fruit bowls with suitable preparation; skip skewers.
5. Mashed-bean wraps: best for pantry-based preparation
Mashed-bean wraps give your child a visible task: turning soft beans into a mash. Serve the tortilla and beans separately if rolling feels frustrating. This is a preparation option, not a claim about changing food preferences.
Suggested ingredients: ¼ cup ready-to-eat canned beans, drained and rinsed, plus 1 small tortilla. Check labels and choose ingredients that fit your child's dietary needs.
Make it together:
- Place the beans in a stable bowl.
- Offer a fork for mashing, with adult help as needed.
- Spread the mash on the tortilla, then fold it or leave it open.
Explain what mashing will change before starting. If your child prefers whole beans, set an appropriately prepared portion aside rather than requiring everything to become smooth.
Mashed-bean wrap pros:
- Uses ready-to-eat ingredients.
- Mashing has a visible result.
- Rolling is optional.
Mashed-bean wrap cons:
- Bean skins and paste-like textures do not suit everyone.
- A tortilla can tear during folding.
Best for: Children who enjoy pressing or mashing with a utensil.
Verdict: Buy into mashed-bean wraps when the texture is familiar; hold if mashing feels unpleasant.
6. Rice-and-topping bowls: best for older-child meal planning
Rice bowls let an interested child plan a meal from separate, familiar components. Offer cooked rice with ready-to-eat toppings in individual dishes. A teenager can help choose the combination without being expected to handle heat independently.
Suggested ingredients: ½ cup cooked rice, ¼ cup ready-to-eat beans, and a familiar cooked vegetable. Prepare each component safely before inviting your child to assemble the bowl.
Make it together:
- Show the available components separately.
- Invite your child to choose what belongs in the meal.
- Scoop ingredients into one bowl or keep separate dishes.
Use freshly cooked rice or rice stored and reheated according to food-safety guidance. Do not use rice that has been left sitting at room temperature as an activity ingredient.
Rice bowl pros:
- Makes ingredient planning visible.
- Accommodates separate presentation.
- Offers a more meal-focused activity for interested older children.
Rice bowl cons:
- Rice storage and reheating need care.
- Several components create more preparation and cleanup.
Best for: Older children interested in choosing and assembling a meal.
Verdict: Buy into rice bowls for supported meal planning; hold on independent heating until safe.
How these recipes were ranked
The 2026 ranking prioritizes clear assembly, optional mixing, and tasks you can adapt without changing the entire recipe. Yogurt bowls lead because ingredients stay separate without a heating stage. Toast faces follow because a familiar base can remain unchanged.
Mini pita pizzas and rice bowls sit lower because heat or food handling adds responsibility. No recipe is ranked by promised developmental benefits, and none is an Autism Learn & Play cooking-program description.
Set up a judgment-free cooking activity
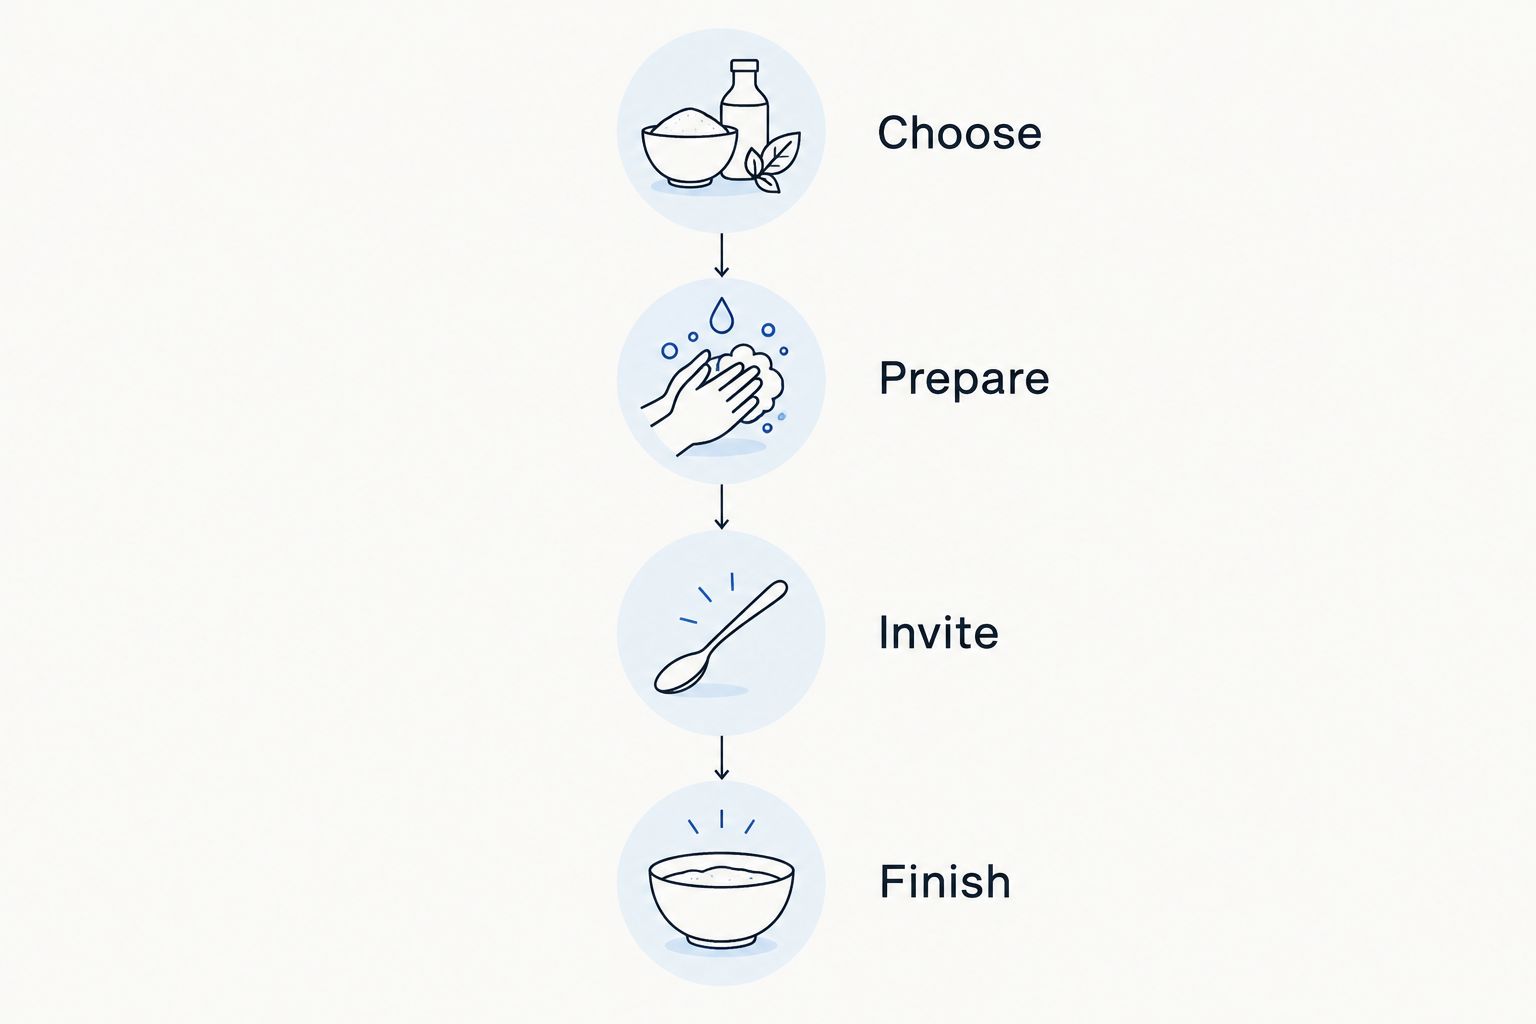
Use the same simple sequence for any recipe: Choose, Prepare, Invite, Finish. Predictability comes from explaining what will happen, not from making your child follow every step.
- Choose: Offer familiar ingredients and let your child decline additions.
- Prepare: Wash hands, clear the work area, and separate adult-only tools.
- Invite: Offer a specific job, such as scooping, watching, or choosing a dish.
- Finish: Show where utensils go and allow your child to stop without tasting.
For ages 2–5, an adult can manage preparation while the child chooses or helps with a closely supervised task. For ages 6–11, offer additional jobs according to demonstrated safety skills. For ages 12–18, respect age-appropriate interests and ask whether meal planning appeals more than playful decoration.
These are invitations, not milestones. Any child can need more support or prefer a simpler role. Keep knives, hot surfaces, and appliances under adult control unless the child has the skills and supervision required.
For a shared activity with friends, ask each family about allergies and support needs beforehand. Separate workspaces and utensils let children prepare alongside one another without sharing food or taking turns with a disliked tool. This is a planning suggestion, not a description of an existing program.
Which recipe should you choose in 2026?
Choose build-your-own yogurt bowls if your child already enjoys yogurt and wants control over ingredients. Choose toast faces for a familiar-food starting point, or mashed-bean wraps for a child who enjoys mashing. Start with the role your child wants—not the finished dish you want.
Autism Learn & Play is a fit for Brooklyn families seeking children's therapy services, community programs, and online classes. To ask about those services and your child's needs, use the website contact form or email info@autismlearnplay.org. Ask directly about any cooking-related activity rather than assuming one is offered.
FAQ
What’s the best cooking recipe for a child with autism?
Build-your-own yogurt bowls are the default choice when yogurt is already familiar to your child. Ingredients can stay separate, and participation does not require heating or tasting.
What if my child doesn’t want to touch the ingredients?
Offer a spoon, a choosing role, or the option to watch. Touching food is not a requirement for joining a cooking activity.
Can toddlers help with these recipes?
Toddlers can join through closely supervised choices and simple tasks that fit their abilities. Adults should handle cutting, heat, and choking-safe food preparation.
Which cooking activities suit autistic teenagers?
Rice bowls and mini pita pizzas offer meal-focused assembly for interested teenagers. Ask what they want to prepare and match responsibilities to safety skills rather than age alone.
Should I encourage my child to taste the finished recipe?
Offer tasting without making it a condition of participation. A child can choose, prepare, or help clean up without eating the result.
Are these recipes suitable for children with food allergies?
Use a recipe only when every ingredient fits your child’s allergy plan. Check labels, utensils, and work surfaces; substitutions do not automatically remove cross-contact risks.
Does Autism Learn & Play offer cooking classes?
Ask Autism Learn & Play directly about cooking-related activities. The nonprofit provides therapy services, community programs, and online classes, but these recipes do not describe a verified cooking class.
One last thing
For your next cooking activity in 2026, let your child decide what counts as finished. That might mean choosing a bowl, washing fruit, or placing one topping. A shared kitchen moment does not need a finished meal to deserve celebration.
Related guides
- Occupational therapy activities for autism at home
- Art therapy activities for autistic kids
- Speech therapy activities for nonverbal autism